Please note that these accumulators are not meant to be disassembled by customers and I do not carry any responsibility for harm on your devices or health!
This article is linked with http://repair4laptop.org/ a good site for laptop fans.
Well, I'm a thrifty guy and always have a hard time to throw away stuff, so I have tried to disassemble my accumulator in order to replace just the failing cells. I can say now it was not a success, it caused damage on vital part of the accu. Therefore take this article as "what to avoid" topic...
 First I tried to wrest the points where I expected plastic hooks. No avail, the cover consists of two parts carefully glued together
 After the first lost fight I decided to punch a few holes with hammer and screwdriver. No avail again, it held tight and it punched and damaged the printed circuit board I didn't expect. On the left side you can see the accu's connectors, the fatal hole is in the center.
 The right key was a hacksaw (normally used for cutting metals) and careful work on the long side opposite to connector and on the two short flanks of the battery.
 Uncovered connector on its PCB, the punched tiny resistor compared to pencil tip and tweezer. Soldering this back is beyond my abilities.
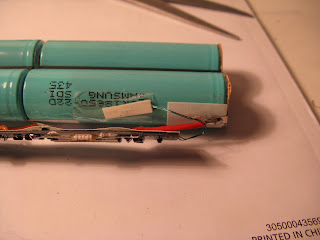
 There even is a little something that serves as thermoreceptor, probably for preventing overheating and explosion.
 That is how the cells are connected together -- in pairs. In my case this wiring and just one failing cell caused the voltage to drop on 8V from 14.8V. The laptop didnt even start.
 You will need a voltmeter to measure for the failing cell. There are four pairs of cells in the accu, three pairs showed 3.7V, one 2.2V.
 The cells are referred to as icr18650 - Rechargeable Lithium Ion Cylindrical Battery. It is all glued in the case.
 I hope it helps..
1 komentář:
Thank you, disassembled battery for asus 1201n, success !! again thx.
Ch.arlie
Okomentovat